
Yes, I *am* very much still cooking! The problem is that I am being extremely anal about trying to perfect my recipes before posting them... and never get them "perfect" enough to post! This is my current best creation, though, and a favorite food of my meat-loving husband! Introducing... Vegan Fajitas!
VEGAN FAJITAS
1 batch gluten "meat" (recipe below)
2-3 bell peppers, any color - seeded and sliced
2 medium onions - sliced into half rings
2 tsp fajita seasoning (recipe below)
2 Tbsp oil
4-6 flour tortillas
1. heat oil in a large skillet over medium heat.
2. add sliced gluten and fry for 5 minutes, until very lightly browned in places, stirring to prevent sticking.
3. sprinkle 1 tsp seasoning over the frying gluten, then fry for an additional 5 min
4. add in sliced peppers and onions, fry for 10 minutes, stirring occasionally.
5. sprinkle 1 tsp seasoning over the vegetables and gluten mix, continue frying until reaches your desired firmness.
6. serve in warmed flour tortillas.
GLUTEN "MEAT"
1c. vital wheat gluten
1c. water
1. mix water and gluten powder to form a wet sponge.
2. create a pocket out of foil, leaving 1" on each side to expand, seal all openings.
3. boil for 25 minutes, or pressure cook at 11# for 20 min.
4. drain well, cool, unwrap, and slice into strips.
FAJITA SEASONING
1/2 tsp seasoned salt
1 tsp ground cumin
1 tsp garlic powder
1/2 tsp white pepper
1+1/2 tsp dried chives OR 1/2 tsp onion powder + 1/2 tsp dried cilantro
1 tsp red pepper flakes or any pepper flakes/powder to taste
add all into an empty spice bottle and seal tightly, shake well.
Saturday, September 22, 2012

Saturday, May 12, 2012
Cranberry Cheesecake Pudding

I was in the mood for some pudding, but was horribly indecisive on what to make! Started out as a plain vanilla bean pudding, then i started dumping things in. Turned out to be my best pudding to date! Definitely one to check out! Makes about 6 cups worth.
CRANBERRY CHEESECAKE PUDDING
Ingredients:
- 4 cups reduced fat milk (i used skim)
- 1/2 cup sugar
- 1 cup cooked rice
- 1/4 cup water
- 1/4 cup cornstarch
- 1 tsp vanilla extract OR 1 split vanilla bean
- 1 tsp almond extract
- 1/3 cup dried cranberries
- 4 oz low fat cream cheese
- mix together milk and sugar in a saucepan (if using vanilla bean, add that now as well), cook over medium heat until just the edges bubble. do not boil. add in the cooked rice.
- stir together the cornstarch and water.
- slowly stir the cornstarch mixture into the milk.
- continue to cook over medium heat until the mixture is thick, and coats the back of a spoon.
- remove from heat and allow to cool for one moment. add the vanilla and almond extracts (if using vanilla bean, remove that now).
- crumble the cream cheese between your fingertips and stir into the pudding. add the cranberries and mix well.
- pour pudding into a cake pan or casserole dish. cool to room temperature, then place in the refrigerator until cooled completely and set.
Sunday, April 22, 2012
Vegan Cranberry Orange Scones


I suddenly had a craving for cranberry orange scones last night, so had to run out to the store to buy what i need! i decided to make it reduced sugar and vegan, so i dont have to worry about what im doing to my poor body! (prediabetic and sensitive to animal products)
This is the recipe i came up with. it still has more sugar than id like, due to the granulated sugar and the sweetened orange juice, so i might have to modify this in the future. since erythritol behaves exactly like sugar, i could easily make this recipe with all erythritol and no sugar. you can also lower the sugar by buying juice dried cranberries instead of sugar ones.
the nutrition label is slightly off, the place i made it at did not have erythritol as an ingredient i could choose, so it doesnt list the sugar alcohols and carbs from it. There are 6 grams of sugar alcohol per piece, and therefor 6 grams carb needs to be added. erythritol has no calories or anything else, though.
the glaze i made turned out very very sweet, so you might want to omit the stevia in it.
VEGAN CRANBERRY ORANGE SCONES
ingredients:
- 1 cup white flour
- 1 cup wheat flour
- 1/2 cup erythritol
- 1/8 tsp stevia
- 2 tsp baking powder
- 1/2 tsp baking soda
- 1/4 tsp salt
- 1/2 cup orange juice
- 1/4 cup oil
- 2 tbsp orange peel
- 2 tsp vanilla extract
- 1/4 tsp almond extract
- 1 cup dried cranberries
directions:
- preheat oven to 400 degrees.
- in a large bowl, mix together the flours, erythritol, stevia, baking soda, baking powder, and salt.
- in a small bowl, mix together the orange juice, oil, orange peel, and extracts.
- add the liquid ingredients to the dry mix. stir until combined, then add in cranberries.
- dump the dough onto a floured surface, and knead lightly a few times to bring it together.
- pat the dough into a large circle (about 8 inches in diameter), then cut into wedges and place on a lightly greased sheet.
- bake scones for 10-15 minutes at 400 degrees.
- if a glaze is desired, grind 1/4 cup erythritol in a spice or coffee grinder with 1/2 tsp cornstarch. place powder in a bowl or cup, and thin out with a couple of tablespoons of orange juice. (i added a touch of clove and stevia to my glaze)
Friday, March 16, 2012
Soft Jalapeno Cheese Curds
I have been getting impatient waiting for my Brie to age, so decided to make a fresh cheese while waiting! This is what I came up with. If you do not have cheese cultures and rennet locally (we can't all be lucky enough to be in wisconsin!), this is a great place to buy it from www.dairyconnection.com

FRESH JALAPENO CHEESE
Ingredients:

FRESH JALAPENO CHEESE
Ingredients:
- 2 gallons milk
- 1/4 tsp mesophilic culture (i use choozit m100)
- 1/4 tablet rennet (or 1/2 tsp if using liquid rennet)
- 1/2 cup water (or 1/4 cup if using liquid rennet)
- 1/4 tsp salt (for tablet rennet) + salt to sprinkle
- 3 finely diced jalapenos
- 1 Tbsp red pepper flakes
Supplies:
- large stockpot
- sharp knife to cut curds
- slotted spoon
- fine cheesecloth (get it at a cheese supply store, the ones you get at the grocery store are far too widely woven)
- colander
- small plate
- gallon jug of water
- very slowly warm the milk to 96 degrees F, keeping a close eye on the temperature with a thermometer.
- add mesophilic starter, stirring gently
- cover and let sit for 30 minutes, keeping the temperature at 96F.
- add rennet to water (and 1/4 tsp salt if using tablet rennet, make sure to stir well til it all dissolves)
- add rennet mixture to milk, and slowly stir in a figure 8 for about 30 seconds
- still keeping the milk at 96F, allow to sit for 30 minutes. after this time a white gelatin like layer will be formed
- cut the curd layer into 3/4-1 inch squares, and let rest for 3 minutes
- gently stir the curds a few times
- begin to raise the temperature of the milk to 116F. do this very slowly, over 30 minutes, stirring occasionally. the curds will start shrinking a bit
- cook the curds at 116F for 45 minutes, stirring gently every 10-15 minutes, being careful to not break the curds too much
- line a colander with cheesecloth, and gently scoop the curds out of the whey with a slotted spoon, into the cheesecloth. (i had small squares of cheesecloth and had to do this twice)
- gather the cloth by the corners and tie it together with some string, hanging it for 20 minutes (make sure it is above the sink or a bowl, it will make a mess!)
- open the cloth and add the jalapeno, red pepper flakes, and a sprinkle of salt over the curds. mix in well
- gather the corners of the cloth together again, twisting it down by the curds to press the curds tight
- place the bag of curds in a colander and set an inverted small plate over the top of it, making sure to cover it completely
- balance a gallon jug of water on top of the plate to press and drain the curds, allow this to sit for 1-3 hours, checking regularly to make sure it is still balanced.
- unwrap your curds and break into small pieces for cheese curds, or leave whole for a delicious spread!
If you want firmer curds (this makes a soft cheese), increase the time that you cook it at 116F to 60 minutes, and stir more frequently, to help the curds release more of the whey. Also press the cheese for 3 hours for firmer curds.
This cheese is best fresh, used within one or two days, but may be kept up to a week. if you wish for a stronger pepper flavor, allow it to age in the refrigerator for a few days before using.
The basic curd recipe can be used with any herb/spices you desire, so definitely experiment with this one! Once you try this and find how easy and cheap it is to make, you will never want to buy fresh cheese again!
See my post on Cheese Stuffed Garlic Biscuits for a great way to use this cheese, or what I will be trying next, and super excited about... melt it over some tortilla chips! Also try this on pizza, and spread over crackers... so many ways to use a good fresh cheese! Enjoy!

Cheese Stuffed Garlic Biscuits
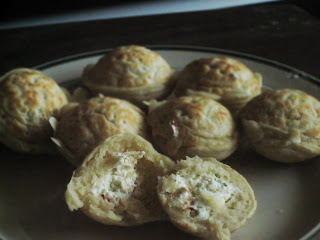
Yes, I HAVE still been cooking, just never think to post things anymore. Boy, have I EVER been cooking! My latest project has been making cheese! I made a batch of a jalapeno soft cheese curd last night, and this is what I came up with to use it for! This recipe uses an ebleskiver pan, which can be found at wal-mart. You can also fry it in shallow oil instead, but I much prefer the ebleskiver method, a lot healthier and more attractive!

This is a basic cheese curd recipe that you can use if you wish to try making your own, or you can purchase some or use a soft spreadable cheese for this. Onto the recipe!
CHEESE STUFFED GARLIC BISCUITS
Ingredients:

This is a basic cheese curd recipe that you can use if you wish to try making your own, or you can purchase some or use a soft spreadable cheese for this. Onto the recipe!
CHEESE STUFFED GARLIC BISCUITS

Ingredients:
- 3 Tbsp butter
- 3 cloves garlic, minced
- 1 + 1/2 cup flour
- 1/2 tsp baking powder
- 1/4 tsp salt
- 1 cup warm water
- cheese curds or soft cheese
Instructions:
- preheat ebleskiver pan on medium heat
- microwave the butter until melted, about 30 seconds
- add minced garlic to melted butter, set aside
- measure and sift flour into a large bowl
- add baking powder and salt to flour, mixing well
- stir water and garlic butter into flour mixture
- lightly brush the pan with olive oil
- drop 2 tablespoons of the batter into each indent on the pan
- cook over medium heat until the center is soft set and the sides are golden
- slide half spheres onto a plate to cool, and add another 2 tablespoons to each place in the pan
- while the second batch is cooking, gently press cheese curds into the center of the cooked halves, or pile soft cheese (about 3/4 tsp each) onto the centers
- when the edges of the second biscuit batch are soft set, but the center is still liquid, firmly press the cheese laden halves on top, which will cause the batter to run out the sides. you need this to happen, so that batter can then cook and seal it.
- continue to fry for several more minutes, pressing the tops down again after a couple of minutes to reseal it. slide one ball gently occasionally to check if the bottom half is finished. fry until golden brown.
- turn the balls so the top half is in the indents again, and cook for 1-2 minutes, until warm.
- slide the balls onto a plate to cool for 5 minutes, then cut along the seams and enjoy!
I made my soft cheese curds with fresh jalapeno and red pepper flakes. If you are using a store bought cheese, you can easily mix these in the day before making it, so the flavors distribute. Try experimenting with different herbs in both the cheese and the batter to find your perfect combination!
These are really simple to make, and with homemade cheese, very cheap as well. They make the perfect party favor for a low budget!
Tuesday, March 1, 2011
Apple Cinnamon Bread Pudding

so, you have your basic white bread now... what to use it for? how about some bread pudding! if i have some bread left over after a day or two, this is what i use it for. delicious and a lot healthier than traditional bread pudding. if you dont like apples, try this recipe with some raisins instead. this recipe serves 4.
APPLE CINNAMON BREAD PUDDING
6 slices basic white bread, cubed
2 cups skim milk
1/2 cup sugar
1/2 an apple, diced
1 1/2 tsp cinnamon
1. preheat oven to 350 degrees.
2. placed diced bread in a lightly sprayed casserole dish
3. add milk and mix well. allow to soak for 10-15 minutes
4. add sugar, diced apple, and cinnamon, mix thoroughly
5. bake uncovered for 20 minutes at 350 degrees
you can view the nutritional content HERE. to make it a bit healthier, try doing 1/4 cup sugar and 1/4 cup splenda.
EDIT: wow, i completely forgot to add vanilla to it! try adding 1/2-1tsp of vanilla extract, depending on how strong you want it to be
Basic White Bread

i've been making tons and tons of my own bread lately, a loaf every day or two, so decided that it is time to share my basic bread recipe! this is a VERY basic bread, but it still tastes great! i love having homemade bread around. for me, it is cheaper to make the bread than to buy it, since i buy my flour and yeast in bulk. if you buy your flour in 5 or 10lb bags, and buy single packages of yeast, it comes to around $1 a loaf. it is only about 20 cents a loaf for me, since i buy my flour in 25lb bags and yeast in 2lbs for $4. yes, that really is bulk! but i use it. my last lb of yeast lasted me about 8 months, now that im making bread daily it will be about 2 months a lb of yeast, and about a month and a half for a bag of flour. anyway, on to the recipe!
BASIC WHITE BREAD
2 1/2 cups flour
2 1/4 tsp instant yeast (one package)
1/4 tsp salt
1 cup warm water
2 tbsp applesauce
1. if using regular yeast, soak it in warm water for 10 minutes.
2. mix the dry instant yeast, flour, and salt in a large bowl.
3. mix the applesauce and warm water together in a small bowl (or yeast water)
4. slowly add the water mixture to the flour mixture. only add a little bit at a time, stirring well after each addition.
5. when all of the water mixture is mixed in, form the dough into a ball and knead for 5-10 minutes.
6. grease a bowl with cooking spray and place the ball of dough into the bowl, spraying the top of the dough lightly.
7. cover with a damp towel and allow to rise in a warm place for 45-60 minutes, or until doubled in size.
8. punch down dough, form into a log, and press gently into a greased loaf pan. allow to rise another 30-45 minutes.
9. bake in a preheated oven at 350 degrees for 50 minutes.
10. using potholders, tip the loaf pan upside down until the bread slides out. cool completely on a wire rack.
and as normal, HERE is the nutritional info! makes about 12 slices of yummy bread. much tastier and a lot healthier than the store bought breads that never seem to go bad. this recipe also makes delicious bread sticks. just form into small thin logs, brush with butter, and bake for 12-15 minutes, brushing with more butter when baking is complete.
i prefer to use this recipe instead of a sweeter or saltier one because this bread is VERY versatile. i can use it for just about anything at all, and it is delicious on its own as well.
Vegetable Curry Casserole

last night i bought a ton of vegetables (carrying 20lbs of vegetables uphill home was a great workout), and made a DELICIOUS casserole! the idea for this came from divan, love chicken-less divan. i wanted to use a variety of vegetables, though, and make it a bit healthier (canned cream of mushroom soup and mayonnaise are so insanely unhealthy!). here is what i came up with! i like mine with a strong curry flavor. you can use less if you aren't a fan of curry.
VEGETABLE CURRY CASSEROLE
5 medium potatoes
1 turnip
1 medium onion
3 carrots
1 stalk broccoli
4 cups cabby's cream of mushroom soup
1/3 cup cabby's ranch dressing II
2 tbsp curry powder
1. dice all of the vegetables into 1/2 - 1 in cubes.
2. boil the potatoes, turnip, and carrots for about 15 minutes.
3. drain the boiled vegetables and place in a casserole dish along with the broccoli and onion.
4. mix together the cream of mushroom soup, curry, and ranch dressing. pour over vegetables and mix well.
5. bake uncovered at 350 degrees for 30 minutes.
and HERE is the nutritional for it. it got a great score for optimal health! it is even better if you use a low sodium homemade broth for the soup, as i do. this is absolutely fantastic spooned over some homemade bread! hope you all enjoy this recipe, it is my new favorite. thought i was making a special treat, and found out that it is perfect for my diet! can eat it all i want!
and if you are interested, it costs about 60 cents a serving, if you use homemade broth (made from veggie scraps) for the soup, and buy the vegetables in bulk bags as i do. that is taking in the amount of ingredients used, it isn't counting the price of leftover ingredients if you have to buy all the stuff in larger amounts than what is used. if you buy all the vegetables separately, and buy the broth, it will probably come to about $1.50 a serving. still a pretty cheap meal!
Monday, February 28, 2011
Cream of Mushroom Soup
As with the ranch, the store bought cream of mushroom soup is just WAY too unhealthy for me, so i made my own. this recipe has two parts, i canned mine after the first section, then use that base to finish it as needed. this recipe as written yields 2 cups base, 4 cups finished.
MUSHROOM SOUP BASE
8 oz mushrooms
1/2 tsp garlic powder
2 cup broth
slice the mushrooms and add them to simmering broth. stir in the garlic powder. simmer for 15 minutes.
CREAM OF MUSHROOM SOUP
2 cups mushroom soup base
2 cups skim milk
1/4 cup flour
whisk all ingredients together in a pot. bring to a boil and boil for one minute. reduce to a simmer for 10 minutes.
the nutritional content HERE is for 2 cups of soup made with Swanson broth. i make mine with a low sodium homemade broth, so its a bit healthier.
Ranch Dressing II

this is my most recent homemade ranch, very low calorie and fat! the store-bought ones are way too high in fat for me, and have an insane amount of calories. this is a delicious and healthy alternative. using all dry milk and powdered buttermilk still turns out great!
RANCH DRESSING II
1/2 cup buttermilk
1/2 cup skim milk
1/4 cup reduced fat sour cream
3 tbsp dry skim milk
1/2 tsp garlic powder
1/4 tsp onion salt
1/2 tsp dill
1/2 tsp basil
combine all ingredients in a blender and blend until smooth.
you can view the nutritional information HERE. it says a tiny amount of regular salt... the site doesn't have onion salt listed. i used the same amount of sodium worth of table salt to make this nutritional label. the recipe yields about 1 1/4 cups worth, and the nutritional is for 2 tbsp.
Thursday, February 24, 2011
Pizza Revised


soooo.... i changed my pizza recipe. i wanted to make it as low cal and fat as possible while still tasting good. here is my NEW pizza recipe! still makes a pan size worth, mine is cut in half to do 2 different sauces. the nutritional information is for 1/6 of the entire pan worth made with marinara sauce and cheese.
PIZZA DOUGH
1 package (2 + 1/4 tsp) yeast
3/4 cup water
2 1/2 cup flour (half white half whole wheat works great)
2 tbsp applesauce
1 tbsp oregano
1 tbsp basil
1 tbsp garlic powder
1/2 tsp onion salt
1. mix the yeast and water (at 105-115 degrees F), let rest 10 minutes. if using instant yeast skip this step.
2. combine the flour and spices in a large bowl
3. slowly add the yeast mixture and applesauce to the flour mixture. make sure you only add a little bit at a time, and mix well! or else your dough will end up dry and stiff.
4. knead the dough for 5-10 minutes, until smooth and elastic, and no longer sticky.
5. spray the bowl with cooking spray. place dough ball in bowl and lightly spray the top of the dough. cover the bowl with plastic wrap or a damp towel and let rest 1 hr, or until doubled in size.
6. punch down the dough and roll it out into the size and shape of the pan you are using.
7. top with 1 1/3 cup of marinara or 2/3 cup ranch dressing.
8. sprinkle 8 oz of cheese over the top of the sauce.
9. add desired toppings. my new favorite is mushrooms, onions, oregano, basil, and tvp soaked with spicy italian seasoning.
10. bake at 375 degrees F for 12-15 minutes, or until cheese browns at the edges.
and now you have your delicious homemade pizza! with all the suggested toppings, it comes to about 400 calories for 1/6 of the pizza. that is a lot better than what you get at the store or delivered! that is a pretty good size portion as well. i normally only eat 1/6- 1/3 at a time.
Monday, February 21, 2011
Baked Beans


so.. one of my husband's favorite foods is baked beans, but we rarely buy it because stores charge an arm and a leg for canned beans!
so ive been making my own the past 6 months or so. its great that i can control the ingredients, make them a lot lower calorie than the store-bought ones, and they are a lot cheaper! i make mine with pinto beans, cheaper than navy beans and tastes pretty much the same. the price of beans at my store went down, so it now costs me about 27 cents for 2 cups of finished baked beans!
yes, that IS cheap, just a tiny fraction of what the large cans cost. this is my diet version, low sugar and salt. still tastes delicious!
3 cups dried pinto beans
1 medium onion
1/2 teaspoon mustard powder
2 tbsp cup pancake syrup
3 tbsp brown sugar
3 tbsp splenda
1 tsp salt
water or broth to cover
CROCKPOT BEANS
1. soak and drain the beans, then place them in a slow cooker (crockpot).
2. add all other ingredients, mix well, and cover with water
3. cook on low heat 8 hrs or overnight
PRESSURE COOKER BEANS
1. soak and drain the beans, place them in your pressure cooker
2. add all other ingredients, mix well and cover with water
3. place the lid securely on the pressure cooker, and process at 15 pounds of pressure for 50 minutes.
SALSA

need something to go with those chips? how about some homemade salsa! this is my quick and easy salsa recipe, medium spicy. cheap too. this recipe makes one quart.
GARDEN SALSA
1 28oz can of whole tomatoes, chopped
1 medium onion
1/3 cup chopped jalapeno
3 tbsp minced garlic
1/4 cup dried cilantro
1/4 tsp salt
1 cup juice from tomatoes
1. mix all ingredients together in a bowl
2. blend half of the mixture and pour back into the bowl
3. chill overnight
that's it! quick, easy, delicious, and cheap! it costs me about $1.75 to make a quart, way cheaper than store bought! experiment with the spices to get different flavors, or try blending with some black bean for a delicious dip.
Sunday, February 20, 2011
CABBAGE STEW

so, i ate pizza this morning, had next to no calories left for my diet for the day, and absolutely no fat! i was WAY over on fat, to tell the truth, so i needed to make something low calorie, low fat, but filling... cabbage stew! the above picture is the nutrition label i got after i plugged the recipe in at nutritiondata.self.com. that is for 2 cups of the stew! healthy healthy food! the sodium for yours may be higher, i used a low sodium homemade broth. i made a huge batch, so here it is halved. makes about 12 cups worth.
CABBAGE STEW
3 medium potatoes, cut into 1 inch pieces
1/4 head cabbage, shredded
6 cups water or low sodium broth
1 onion
1 carrot
1.5 cups drained kidney beans
1/2 cup potato flakes
salt and spices to taste
1. add the broth or water, carrot and potatoes to the pot. boil for 20 minutes.
2. add the onion, cabbage, and kidney beans. boil another 20 minutes or so, until cabbage is wilted and potatoes are soft.
3. add salt and spices to taste. i add parsley, celery seed, and salt.
4. stir in the potato flakes. add more for a thicker stew.
PIZZA!
2/24/11 EDIT: i changed my pizza recipe, see the revised version here.
I completely forgot to take pictures of the pizza this morning (hubby gets home at 830am, made it then), so i will add the pictures next week when i make it again. This is one of our favorite things to make, it equals out to cheaper than frozen pizza (about $1-$1.50 a pizza), and hubby likes it better than delivery! This makes two small pizzas with medium thickness dough.
PIZZA!
1 package yeast (2.25 tsp)
1 cup warm water
2 1/3 cup white flour
2/3 cup wheat flour ( or use 3 cups white if you don't have wheat)
3 tbsp oil
2/3 cup sauce
8 oz cheese
1. mix the yeast and water and let stand for 10 minutes. if you are using instant yeast, skip this step and just mix it with the flour.
2. add the yeast mixture (or just water if using instant) to the flour. add oil and mix well.
3. form the dough into a ball and knead for 5-10 minutes.
4. spray the dough lightly with cooking spray and place it back in the bowl. cover with plastic wrap and let rest for 1 hr.
5. punch the dough down, then roll it out on a floured board. i roll mine out to the size of a 14x15in baking sheet.
6. place the dough on the baking sheet and spread over it your favorite sauce. i normally cut my dough into two, do one red sauce and one ranch.
7. spread cheese evenly over the top of the sauce.
8. add desired toppings. we normally do garlic salt, basil, and oregano.
9. bake on the lowest rack in a preheated oven at 350 degrees for 15 minutes (longer if your dough is thick).
10. let cool a few minutes, cut, and enjoy!
Saturday, February 19, 2011
Tortilla Chips

Wow, long time without posting again! As normal, i was sick for a long time, and not cooking much at all (4 months of bronchitis that ended with 2 weeks bedridden!). i am finally back on my feet, and cooking up a storm! only remembered to take pictures and write down one thing, but there will be tons more coming soon!
i have been doing a TON of budgeting lately, money is really tight so we are eating as cheap as we can. we aren't having to sacrifice much, though, as the foods i can make for cheap are things we love! so today's post is a cheap snack ive been making, and a lot healthier than the fried store versions! BAKED TORTILLA CHIPS! these come out to about 40 cents a batch, which is 1/2-2/3 of a bag at the store. super cheap for a great snack! ive been serving mine with a homemade salsa or bean dip.
MAKING THE TORTILLAS
2 cups masa harina (corn flour treated with lime)
1 1/4 cup water
1. measure the masa into a bowl, gradually add the water and stir til it forms into nuggets.
2. using your hands, form the dough into a ball, then separate into 16 pieces.
3. roll one piece of dough into a ball, place it between two plastic sheets, then press it flat with a tortilla press or other object
(i used an inverted coffee can lid, and pressed with my fingertips, feeling for lumps)
4. peel the top plastic off the tortilla, then flip and peel the other piece of plastic off.
5. brown on a skillet over medium high heat until bubbles form on top. flip and cook another 30 sec or so.
6. repeat steps 3-5 for remaining pieces of dough.
MAKING THE CHIPS
16 corn tortillas
1-2 tbsp oil
salt to taste
1. preheat oven to 350 degrees.
2. dip a pastry brush in the oil and wipe a thin layer of the top of a tortilla.
3. continue wiping a thin layer onto the tortillas until the brush dries on both sides, then re-dip. stack tortillas on top of each other as you coat each one.
4. after all tortillas are coated in oil, place a small pinch of salt on top of the top tortilla and rub in with fingertips.
5. repeat step 3 til all tortillas are salted, re-stacking as you finish each one.
6. using a large knife (chef's knife works great) cut the tortillas across the middle. turn 90 degrees and cut again, making quarters.
7. arrange pieces on a baking sheet, making sure that they dont overlap.
8. bake at 350 degrees for 12 minutes, longer if your tortillas are thick. repeat until all are baked.
Make sure to come back tomorrow for pizza day!
Thursday, September 30, 2010
CABBAGEY ROLLS

Wow, been forever since I posted last! I have been doing a lot of cooking, but always forget to take pictures or write down recipes. I did finally remember to take a pic, though (the second time I made this, forgot the first time), and the recipe is so simple that it didn't need writing down... so here we go! My healthy version of egg rolls! These are delicious, quick and easy, and with the wrappers I use, only about 63 calories per! Can't beat that!
CABBAGEY ROLLS!
Ingredients:
1/4 head cabbage, shredded
1 medium yellow onion, chopped
1 carrot, grated
3 eggs, beaten
5 Tbsp soy sauce
pepper to taste
12 spring roll wrappers
1. spray a pan or wok with cooking spray and fry the egg in a pancake until set. once cool, cut into strips.
2. using a nonstick wok, or a wok with a tablespoon of oil coating it, fry the cabbage, onion, and carrot with the soy sauce and pepper to taste. Cook until mixture is soft.
3. mix the vegetables with the egg and set aside to cool.
4. prepare the spring roll wrappers per directions. mine didn't include instructions, I just soaked it in warm water until soft.
5. place 3 tablespoons of mixture in the middle of the wrapper. fold the bottom up (loosely. if you try to make it tight it will rip), then fold in the sides and roll to the top.
6. chow down and make one for someone else!
Here is a picture of the spring roll wrappers I use. They are thin and translucent, just flour, salt, and water. The yellow ones in the refrigerated section are more like eggroll wrappers, containing egg, and are best cooked, not raw.

Monday, July 26, 2010
Sweet Noodles with Egg


This is my version of pad see ew (i dont often have broccoli around). It is a simple and delicious dish that anyone can make! This recipe serves one.
1 small handful chinese noodles
2 eggs
2 tablespoons oil
5 tablespoons soy sauce
2 tablespoons white sugar
1. boil the noodles for 7-8 minutes or until al dente.
2. heat oil in wok. add eggs and scrambled until done.
3. add cooked noodles to the eggs.
4. add soy sauce and sugar. stirfry for 2 minutes.
5. serve and enjoy!
Saturday, July 3, 2010
Strawberry Spice Cake

Growing up, my mom always made the best cakes for the 4th of July (it is my father's birthday). I remember her doing strawberries and blueberries and making a flag out of a cake. So to celebrate the holiday this year, I decided to make a cake with strawberries! This was an experiment that turned out absolutely heavenly!
DOUBLE SPICE CAKE
2 1/2 cups all-purpose flour
1 tablespoon baking powder
1/2 teaspoon salt
1 1/2 cups sugar
1 tablespoon ground cinnamon
1 tablespoon ground cardamom
1 tablespoon ground cloves
2 tablespoon ground allspice
2 tablespoon ground nutmeg
1/2 cup butter
2 eggs
1 cup milk
2 tablespoons vanilla extract
1. sift together the flour, baking powder, sugar, and spices.
2. melt butter and mix in along with the milk.
3. stir in the eggs and vanilla extract.
4. pour into a greased cakepan and bake in a preheated oven at 350 degrees for 30 minutes.
CREAM CHEESE FROSTING
16 oz cream cheese, softened
1/2 cup powdered sugar
1 tablespoon vanilla extract
1. cream together all ingredients until well blended.
2. spread over cooled spice cake.
JUICY STRAWBERRIES
1 lb strawberries
1/2 cup sugar
1. cut off tops of strawberries and quarter them.
2. put strawberries into a bowl and pour sugar over, mixing til well covered. let rest 1-2 hours.
3. spoon over slices of cake.
Tuesday, June 15, 2010
DINNER ROLLS

I wanted to make up a ton of rolls for the soup kitchen I volunteer at, so I used this nice and easy recipe! I used 2 packets of yeast per batch, but you can do it with 1 and increase rise time to an hour.
QUICK DINNER ROLLS
2 1/4 cup flour
2 tablespoons sugar
1 teaspoon salt
2 packages of dry yeast
1 cup very warm water
2 tablespoons butter
1 egg
1. Mix 1 1/4 cups of flour, the sugar, the salt, and the yeast in a large bowl. Add water, shortening, and egg; beat with spoon until smooth.
2. Stir in remaining flour.
3. Cover with a damp towel and let rise for 20 minutes or until double.
2. Grease 12 regular size muffin cups. Stir down batter and spoon into muffin cups. Let rise 20-30 minutes or until batter rounds over the top of the cups.
4. Heat oven to 400 degrees. Bake 18 minutes or until golden brown.
Subscribe to:
Posts (Atom)